Returned Bearings Inspection: How Distributors Verify Quality
Returned bearing inspection determines resale viability through systematic verification of packaging, steel stamps, and anti-rust oil. Precision instrument testing for clearance and vibration reveals hidden internal defects that visual checks miss. Apply a strict grading protocol to distinguish spec mismatches from damage and protect your distribution margin.
-
By author
- Updated
- 7 min read

Returned Bearings Inspection: How Distributors Verify Quality
Pristine packaging does not guarantee a pristine bearing.
Systematic inspection of returned bearings—from visual packaging checks to precision instrument testing—is critical to determine resale viability. Distributors must verify steel stamp markings, evaluate anti-rust oil condition, and measure internal clearance and vibration to distinguish between simple spec mismatches and hidden internal defects.
I still remember the silence in the warehouse when we opened those boxes from Dubai. The outer cartons looked perfect, sealed tight with original tape. But inside, the deep groove ball bearings were speckled with rust. The anti-rust oil had degraded during the long sea transit, leaving the steel vulnerable to moisture trapped in the container. That shipment taught me that what you see on the outside is often a lie. In the distribution business, a return is not just a logistical headache; it is a financial puzzle. If you cannot accurately assess the condition of a returned unit, you either lose money by scrapping good stock or risk your reputation by reselling damaged goods. Understanding the returned bearing inspection process is the only way to protect your margin. [NEED_CITE: industry standards for bearing storage and preservation]
The core challenge for regional distributors and MRO wholesalers is standardization. Without a rigid protocol, every inspector makes subjective calls. One person might pass a bearing with slight discoloration, while another rejects it. This inconsistency leads to inventory bloat and customer disputes. By adopting a step-by-step methodology, you transform a chaotic return pile into a structured decision matrix.
Why Do Bearings Get Returned?
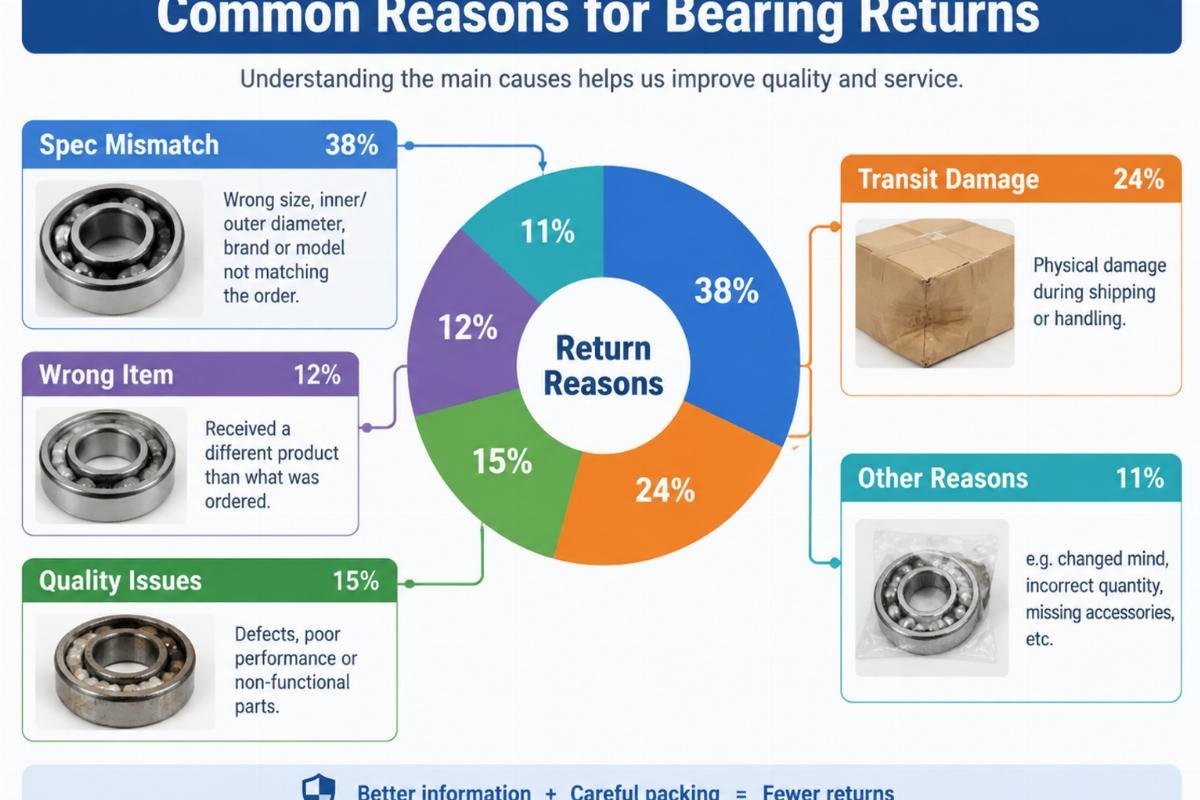
Before touching a single bearing, you must understand why it came back. The root cause dictates the inspection depth. Returns generally fall into two categories: administrative errors and physical damage.
Administrative errors are surprisingly common. A suffix letter mismatch—such as ordering a C3 clearance bearing instead of standard CN—can render a perfectly good bearing useless for the specific application. In these cases, the bearing itself is often untouched. Physical damage, however, is more insidious. It includes transit moisture damage, handling impacts, or incorrect installation attempts that leave subtle marks on the raceways.
| Return Cause | Visual Indicator | Inspection Focus | Resale Potential |
|---|---|---|---|
| Spec Mismatch | None | Steel stamp verification | High (if unopened) |
| Transit Moisture | Rust spots, oily residue | Anti-rust oil status | Low to Medium |
| Handling Damage | Dents, scratches | Raceway surface check | Low |
| Installation Error | Spin marks, heat discoloration | Clearance and vibration | Very Low |
[NEED_CITE: root cause distribution per ISO 15243]
A Middle East steel mill once returned a batch of spherical roller bearings because they “felt rough.” Upon inspection, we found no internal damage. The issue was purely perceptual; the new bearings had tighter tolerances than the worn-out ones they replaced. This highlights why understanding the context of the return is as important as the technical check. If the return is due to a spec error, your inspection can be faster. If it is due to performance issues, you must dig deeper.
Step 1: Visual and Packaging Inspection
The first line of defense is the eye. But do not just glance; scrutinize. Start with the packaging. Is the original box intact? Are the seals broken? For distributors dealing with premium brands like SKF, FAG, or NSK, the packaging integrity is a proxy for the product’s history. A crushed box suggests impact, which could have misaligned the rolling elements even if the outer ring looks fine.
Next, check the steel stamps. This is where many returns are resolved instantly. I have seen countless bearings returned because the buyer ordered the wrong suffix. By verifying the markings against the purchase order, you can confirm if the part number matches. If the stamps are illegible or missing, the bearing should be flagged for further testing or rejected, as traceability is lost. [NEED_CITE: guidelines for bearing identification and marking]
The most critical visual check is the anti-rust oil. As I learned from that Dubai shipment, oil degradation is a silent killer. Wipe a small amount of oil onto a white cloth. If it appears cloudy, contains particles, or smells rancid, the protective barrier has failed. Look for “foxing” or superficial rust on the exposed surfaces. Note that superficial rust can sometimes be cleaned, but pitting is permanent.

When inspecting the bearing itself, look for handling damage. Drop marks on the outer diameter or scratches on the sealing lips indicate poor handling during the return shipping process. These defects may not affect immediate function but will compromise the bearing’s life in high-speed applications. For distributors, documenting these visual findings with photos is essential for claiming credits from suppliers or explaining rejections to customers.
Step 2: Precision Instrument Testing
Visual checks are necessary but insufficient. A bearing can look perfect and still be dead inside. Micro-clearance shifts and internal raceway damage are invisible to the naked eye. This is where precision instrument testing separates professional distributors from casual traders.
The first test is radial internal clearance. Using a feeler gauge or a dedicated clearance measuring device, check the play between the inner and outer rings. Compare this measurement to the manufacturer’s specifications for that specific bearing class. If the clearance is outside the acceptable range, the bearing has likely suffered from brinelling or wear. [NEED_CITE: technical data for radial internal clearance limits]

The second, and more definitive test, is vibration analysis. Even if the clearance is within spec, spalling or cage damage will generate abnormal vibration signatures. Use a vibration meter to measure the velocity or acceleration of the bearing while rotating it at a low speed. High vibration levels indicate internal defects that visual inspection missed. This step is crucial for bearings intended for precision applications, such as machine tools or electric motors, where noise and smoothness are paramount.
In my experience, a significant portion of bearings that pass visual checks fail vibration tests. This is especially true for bearings that were installed and then removed. The act of installation and removal can cause subtle indentation on the raceways, known as false brinelling, which only shows up under dynamic testing. For distributors, investing in basic vibration testing equipment pays for itself by preventing the resale of defective units.
Step 3: Grading for Resale or Scrap
Once the inspection is complete, you must make a decision. Not all returned bearings are equal. Create a grading system to categorize them efficiently. This ensures consistency across your team and provides clarity for potential buyers in the secondary market.
Grade A: New/Unopened. The packaging is intact, seals are unbroken, and visual checks confirm no external damage. These can be resold as new stock. Ensure the part number matches the order exactly.
Grade B: Open Box/Unused. The box was opened, but the bearing shows no signs of installation or handling damage. Anti-rust oil is intact. These may need repackaging but are functionally new.
Grade C: Used/Good Condition. The bearing has been installed but shows minimal wear. Clearance and vibration tests are within acceptable limits. These are suitable for non-critical applications or emergency repairs where cost is a primary factor. [NEED_CITE: criteria for used bearing reuse in industrial maintenance]
Grade D: Damaged/Scrap. Any bearing with visible rust, pitting, out-of-spec clearance, or high vibration. These should be scrapped or sold for material recovery only. Never attempt to resell Grade D bearings as functional units.

This grading process protects your brand. When you sell a Grade C bearing, you are transparent about its condition. This builds trust with MRO clients who need affordable options for non-critical machinery. Conversely, mixing Grade C with Grade A erodes confidence and leads to higher return rates in the future.
When a return fails inspection, the need for replacement is immediate. Our comprehensive inventory allows distributors to quickly source genuine replacement bearings from brands like TIMKEN, NTN, or KOYO, ensuring that their customers’ downtime is minimized. We provide technical support to help identify the correct equivalent models, preventing the same spec mismatch errors from recurring.
Conclusion
Inspection is not just about rejection; it is about value recovery.
A rigorous returned bearing inspection process transforms a logistical loss into a managed asset. By combining visual scrutiny with precision testing, distributors can accurately grade stock and maintain quality standards. This discipline protects your reputation and ensures that every bearing sold, whether new or secondary, meets the required performance criteria.
Tags
Share this article

Written by
author
Editor covering global sourcing, supplier verification, and industrial product knowledge. Content is compiled from manufacturer specifications, industry standards, and hands-on experience with international B2B buyers. Every article is fact-checked before publishing to help procurement professionals make informed decisions.
More articles by author

